OM – Manage Users – Care Control Learning Hub

OM - Manage Users

This guide will cover how to user the Manage Users module within the Organisational Management tool on Care Control Windows.

This part of the OM tool is the final stage in bridging staff member accounts between Care Control Windows and Care Control Cloud.

Play Video

1

In the Organisational Management tool in CC Windows, select the Manage Users module.

2

Here, a list of the staff members who have been linked from CC Windows to CC Cloud will show.

You can begin adding another one by pressing Add New User.

3

A blank form will open, here you can choose to create a new staff member by filling out the form manually, or, choose to ‘Seed from Staff’ which populates the form using an existing staff members details.

Most of the boxes are self-explanatory (name, email, mobile number etc.) however there is some new terminology to be aware of:

  • User Type – organisation (works within the organisation; most common), GP, Pharmacist etc.
  • Position – the CC Cloud equivalent of a staff role
  • Department – the CC Cloud equivalent of a staff category
  • Start-Up Application – which area of CC Cloud will open when the staff member logs in
  • Analysis Level – the level of detail in analysis reports the staff member can view
  • Default Site – the main site the staff member will be associated with
  • Seed User Record – if creating a new staff member, this record will also create a staff record on CC Windows
You can also load a user picture if one is not already associated with the staff member.

4

The second tab of the form is where you can assign the access roles to the staff member. These were covered in the previous guide: 

OM – Manage Access Roles – Care Control Learning Hub (cclearninghub.co.uk)

Access roles determine what, who and where a staff member can access. Simply select the roles required from the left hand list and press Add Role to move them to the right hand list.

You can Create New Roles and also view Role Information via the dedicated buttons at the bottom. After completing the form, press Save Changes.

5

Your new staff member will appear in the User Overview page of the Manage Users module.

Press the eye icon to view more details.

6

A new window will open. Here, a series of tabs are displayed which contain the details of the staff member and their access.

The first tab gives an overview of the staff members role, contact details and access level.

7

The second tab contains the User Access Roles assigned to the staff member.

8

The third tab is where any Other Access Roles are decided.

These roles are based upon the staff members Department and Position. A user may inherit certain roles due to their department or position that differ to their individual roles.

This section is read-only and is purely to inform you of the roles assigned to the staff member.

9

The Apps & Orgs Info tab is where you can view what applications and organisations the staff member has access to, based upon their access roles.

The left hand column will list the sites, units, regions etc. that are accessible and the right hand column lists the applications available, for example eMAR, Care Planning and Roster.

10

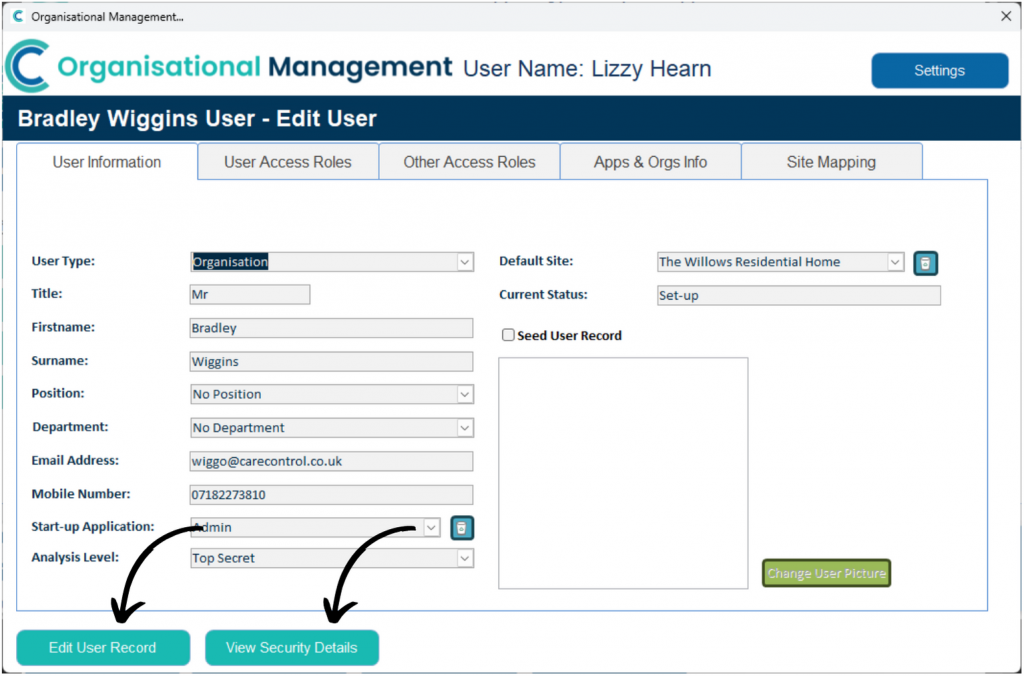
The final tab, Site Mapping, is where the user account can be linked to existing sites in the organisation.

For most staff members, they may only have a staff profile at one site and therefore only need to be linked to that single account. However, in some cases, a senior staff member may have staff profiles at multiple sites – they can all be linked here.

To link sites to this staff member, press Edit Site Mapping.

11

A new window will open. A list of sites in the organisation will display.

To link, or ‘map’, a new site to the staff member select the associated staff member from the drop down list next to the relevant site. 

For example, if we wish to link the staff members profile at Ellis House Day Centre, we would find it in the first drop down list.

12

After selecting the staff member from the list, press the Green Arrow in the middle to move it into the New Mapping column.

After completing the necessary links, press Save Changes.

13

When viewing a staff members information, you can press the Edit User Record button in the bottom left to amend the details on the tab you are viewing. 

You can also View Security Details about the staff member via the dedicated button.

14

This will open a new window containing further details about the staff member, including their Unique ID, Status and Last Login Details.

There are also actions which can be taken from this page:

  •  Reset Account – resets the log in details and status for the staff member.
  • Deactivate Account – removes the accounts access and ability to use CC – useful if a staff member leaves.
  • Reactivate Account – enables the accounts access and ability to use CC – useful if a staff member rejoins an organisation.
  • Unlock Account – unlocks a staff members account which has auto-locked due to failed log-ins.

15

When back on the User Overview, there are also options to Manage Departments and Positions within the organisations.

Press one to amend.

16

A new window will open. 

A list of the active Departments within your organisation will be displayed. Press Edit Departments to amend them or add new ones.

17

You can change the name of existing departments in the text box or remove them entirely using the X symbol.

You can also create new ones by typing in the blank text box at the bottom of the list.

Make sure to Save Changes after making any edits.

18

The same steps can be applied to Manage Positions.

19

A new window will open with a list of your active Positions within your organisation.

Press Edit Positions.

20

In the same way as in step 17, you can change the name of existing positions, remove them entirely and add new ones.

Make sure to Save Changes after making any edits.

Powered by BetterDocs

Important links

Contact

support@carecontrolsystems.co.uk

01822 738 100

v2.40