
Single Form Monitoring
This guide will cover how to create custom Single Form Monitoring within Care Control Windows. This is our most complex custom monitoring and can be configured to perfectly suit the needs of your organisation.
Note – single form custom monitoring can be created on Windows but can only be recorded on Care Control Mobile.
We have a supporting series of video tutorials to use along side this written guide. Above, the first part of this series is linked to watch on this page. To view Parts 2 - 5, please follow this link
Full Video Library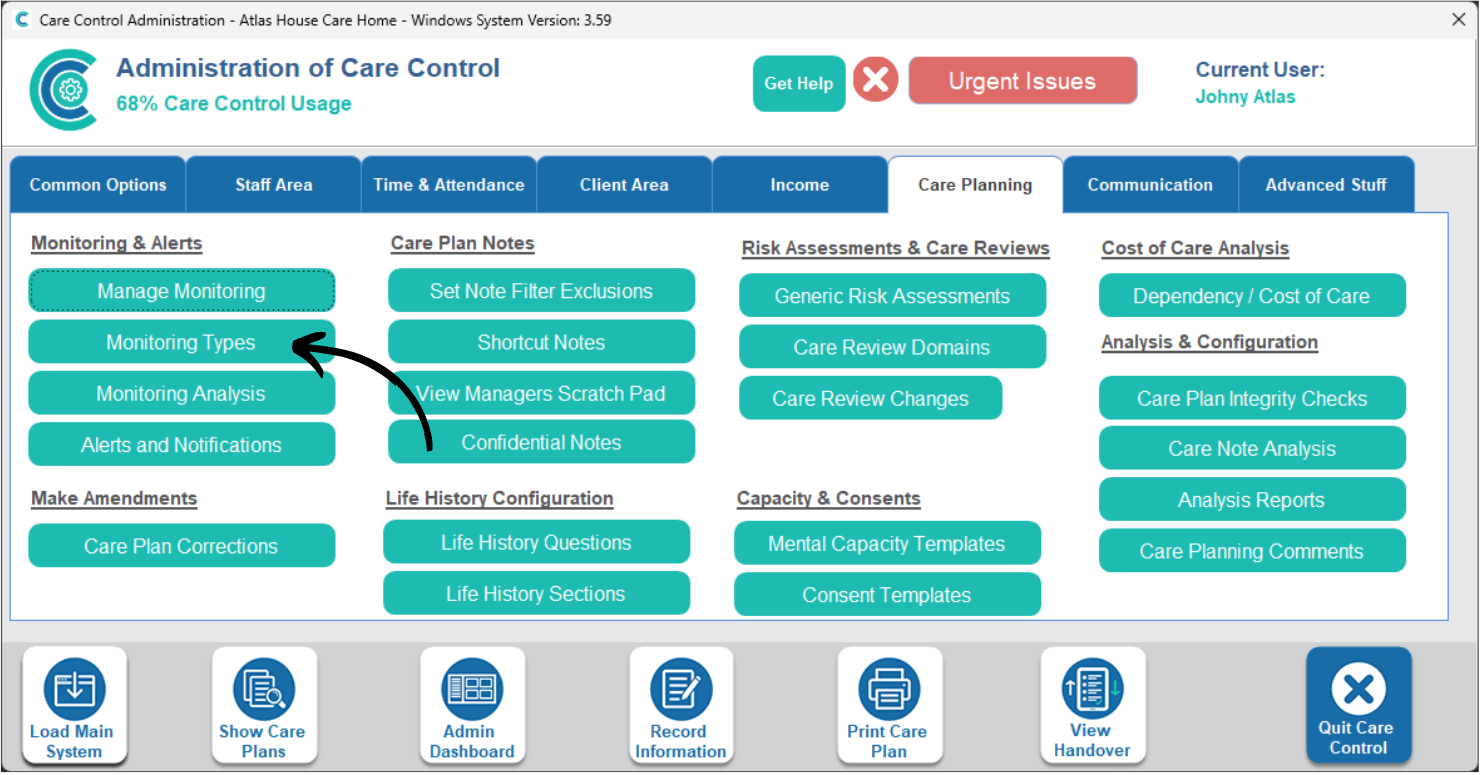
1
In the Administration of Care Control Windows, open the Monitoring Types tool, which can be found under the Care Planning tab.
2
Press Create New.

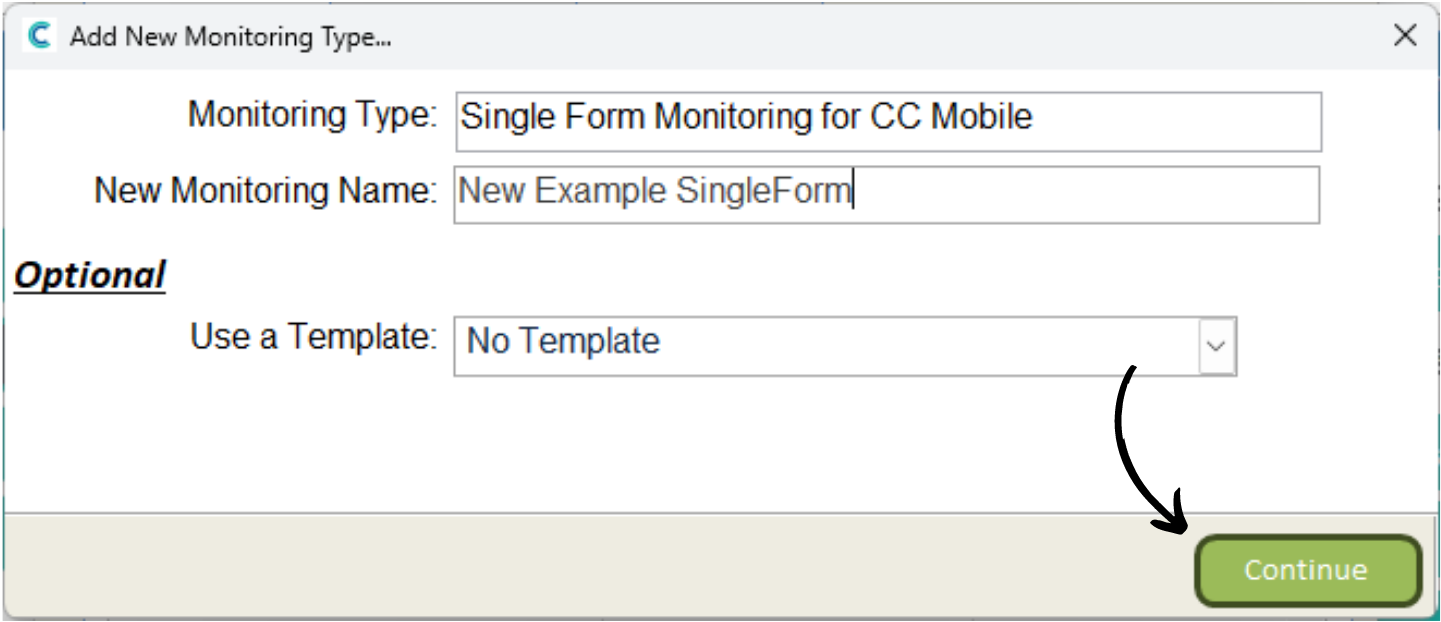
3
Select Single Form Monitoring for CC Mobile and enter a name for your new monitoring area. Then, press Continue.
Note – you can use an existing monitoring area as a template via the drop-down menu.
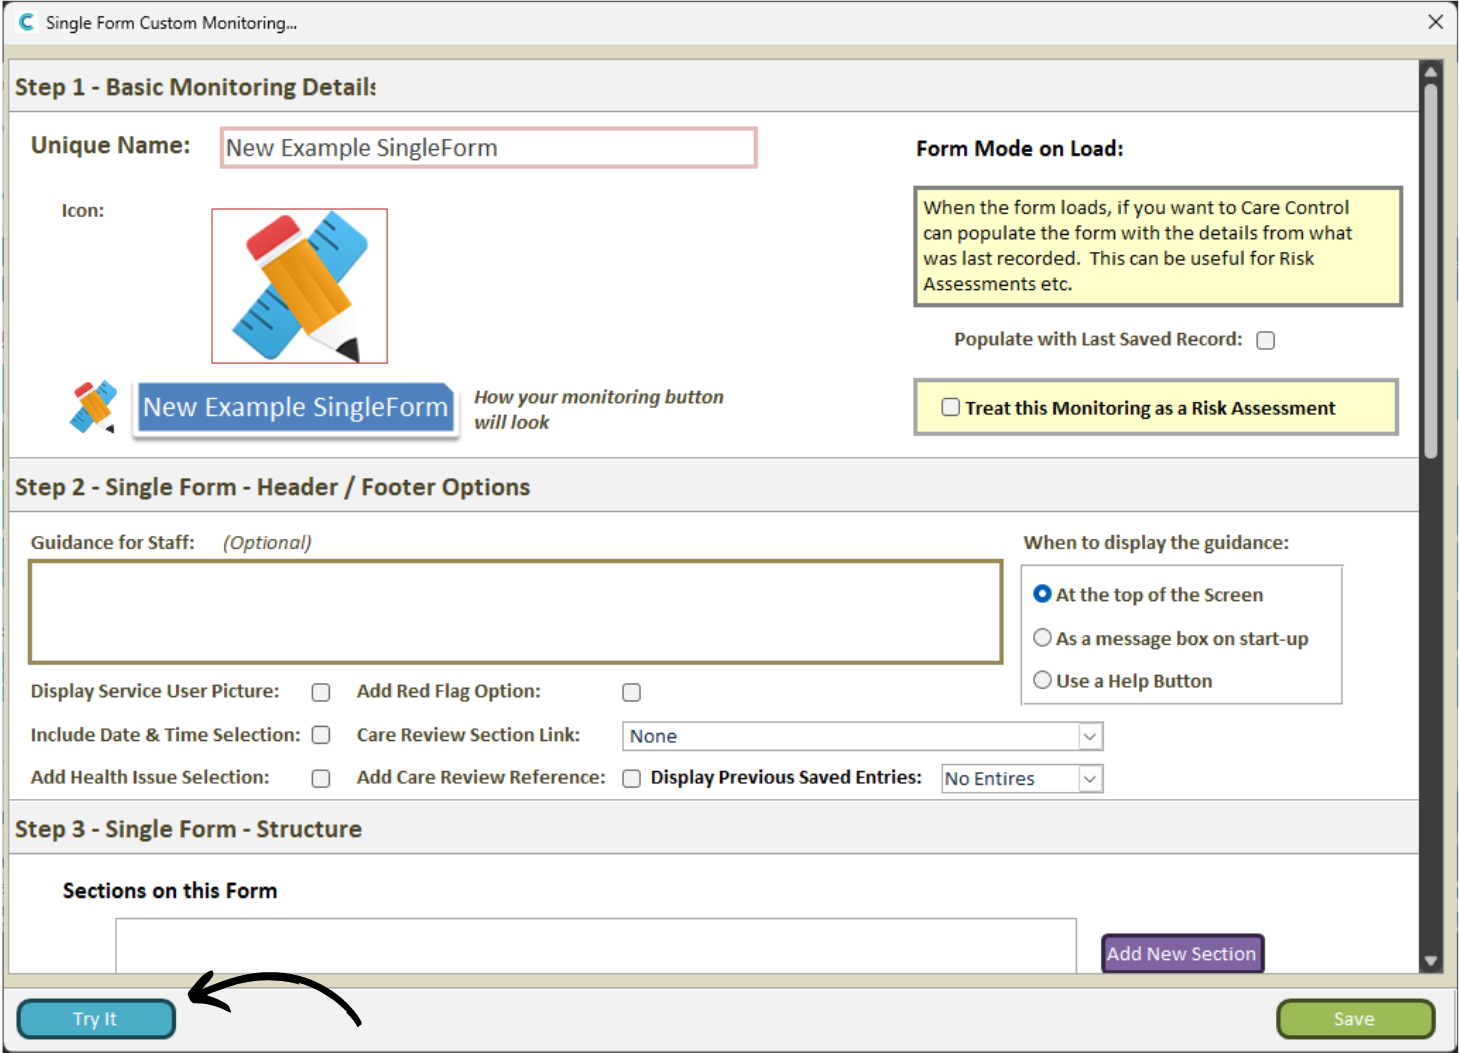
4
At this point in the set up, it is useful to press the Try It button in the bottom left corner.
This will open CC Mobile and display your new form as you create it. Make sure to install CC Mobile on your computer and set it up with your SITE Code etc.
Every few steps we recommend you save your form and refresh your CC Mobile preview to help understand and visualise the changes you are making.

5
The first section of the form (Basic Monitoring Details) is where you can amend the name and icon of the monitoring (simply click on the icon/name to change)
You can also choose whether your monitoring form will populate with the last recorded version when a new instance of the form is created. This can be useful for risk assessments when certain information won’t change between instances.
Finally, in the basic details, you can choose to set this monitoring form as a risk assessment so that it appears alongside the other RA’s on the system.
After clicking on the icon to change it, a new window will open.
Press Load Image to open the files on your laptop / computer. Select the image / icon you wish to use and press Open.
Your file explorer should close and your image should display in the box as seen in the example on the left.
Press Save Image to complete the icon change & return to the creation form.


6
First, enter some Guidance for Staff in the dedicated text box and choose where the guidance will be displayed via the checkbox on the right. The text entered can contain useful information relating to the monitoring area for your staff members.
This section contains further display options:
- Display Service User Picture – shows the selected service user on the form.
- Add Red Flag Option – gives the option to flag the associated monitoring note.
- Include Date/Time Selection – allows manual choice of the date and time for associated monitoring note.
- Care Review Section Link – allows the opening of a specific section of the care review.
- Add Health Issue Selection – allows the monitoring note to be linked to an existing health issue.
- Add Care Review Reference – allows you to add a reference tag option on the form.
- Display Previous Saved Entries – allows you to view X number of previous versions of this form.
7
After setting the display options, go back to CC Mobile (or open with the Try It button) and refresh the page via the button in the top right corner. Your display options should now show:
- Date & Time Selection
- Guidance (set as help button)
- Service User Photo
- Care Review Section Link
- Care Review Reference
- Red Flag Tagging


8
We can now move onto the next stage in creating the form – the structure. The monitoring can be separated into sections, each with its own sub-sections (questions).
Press Add New Section to begin.
9
A new window will open, here, enter the name of your section in the Section Text box. You can also choose to show or hide the section number and name, as well as add a separator line between the heading and sub-section questions.
The Width % option is how wide the first column is in relation to the overall width of the page. The default is 50%. Press Update to save the section. You can also Refresh the CC Mobile page to review your changes.


10
Now you have a section, press Add New Question to create a question within the new section.
11
A new window will open.
1 – Select the section you wish to assign this question to from the drop down list.
2 – Enter the text for the question.
3 – Select the Question Type from the drop down list (see below).
4 – Add a response via the dedicated button.
In this example, a Drop Down Select question type has been used. This means that an answer from a drop down list can be used to answer the question.

There are 6 question types to choose from:
– Free Text Entry – type the response to the question in a text box next to the question.
– Drop Down Select – select a single response to the question from a pre-set list of options (drop down menu).
– Single Select Horizontal – select a single response from a horizontal list of options all displayed on the screen at once.
– Single Select Vertical – select a single response from a vertical list of options all displayed on the screen at once.
– Multi Select Horizontal – select multiple responses from a horizontal list of options all displayed on the screen at once.
– Multi Select Vertical – select multiple responses from a vertical list of options all displayed on the screen at once.

12
Adding a response will open a new window. You can choose to use response text or a response image to select.
Simply enter the text or image as required. You can also add a response score.
Scoring is useful in monitoring you wish to analyse and track over time. For example, if the monitoring concerns falls or slips, certain responses might score more highly to indicate more risk or more of a hazard.
After creating the response, press Update.
13
Continue to create the responses to your new question.
You can also load responses from other monitoring areas or other questions via the orange button labelled Load Other Response Set.


14
A new window will open:
- Select an existing monitoring area from the Custom Monitoring drop down menu.
- Select a Question Set from the monitoring to load the responses.
- Select the response you wish to use.
- Press Process after selecting your responses.
15
After completing the sections and questions, we can move to the output of the monitoring. This includes how the scoring of the responses is displayed and how the note is generated after completing the monitoring.
Begin by choosing a Score / Score Mapping option, these are explained below. Then, press Set Score Mapping if necessary.

– Hide Score – this can be chosen if a scoring system has not been used within this monitoring. No scoring will be displayed in the final output of the monitoring.
– Display Score – this option results in the total score of the responses being displayed at the bottom of the form as the monitoring is being complete.
– Display Score Mapping – this options results in a pre-set text message or image to be shown, depending on what score is reached as the monitoring is completed. For example, if a total score of 5 is reached after the questions have been answered, then the text Low Risk is displayed. If a total score of 10 is reached after the questions have been answered, then the text High Risk is displayed.
– Display Score & Mapping – both the total score and its meaning are displayed.
Score mapping is a useful tool in the synthesis of a monitoring area and can allow for quick analysis and comparison of scores and results between service users and previous instances of the monitoring.

16
A new window will open where you can set the parameters of your score mapping. You can use an existing mapping from another monitoring area by pressing Load Mapping or create a new one by pressing Add Mapping.
17
Another new window will open. Here you will lay out the text or image which will be shown when a certain score is reached.
1 – Enter the range of the score for which the text or image will be displayed.
2 – Choose the text or image which will be shown if the score is reached.
3 – Press Update when complete.


In the same way as above, you can display an image when a certain score range is met.
Select Image and enter an Image Description. You can load an image by tapping on the pencil icon, following the same process as in Step 6 of this guide.
18
Continue to complete the score mapping as required.
Note – if scoring ranges are consecutive, make sure that scores do not overlap (for example, 1-5, 5-10. The score 5 would fall in both categories).
Simply close the window after completing your score mapping.


19
The final part of creating the monitoring form is to build the note which is generated after the monitoring is completed.
Press Build to continue.
20
The Care Control note builder uses prompts (shown in square brackets) which are replaced with information unique to the service user, staff member of information recorded when the note is saved. In the example, the note starts with [Full Name]. When this note is saved, this will be replaced with the service users name.
Another example of this is at the end of the screenshot note, which says “The monitoring was completed by [SFull Name]”. When this note is saved, the square brackets will be replaced by the name of whichever staff member recorded the monitoring. The note will therefore read “The monitoring was completed by John Doe”.

(1) – The best way to build a note like this is to use a combination of prompts and manually written text. Simply press on the prompt button on the right hand side to insert it into the note on the left.
(2) – The note builder within single form custom monitoring contains some extra options:
- The [IF] prompt – a conditional prompt which can display text IF certain criteria is met, i.e a certain score. An example of this would be to display some advice on a high falls risk service user IF the falls monitoring scored 5 or above. If the falls monitoring scored less than 5, then the advice would not be displayed. The set up process for this is covered in the next step.
- The [Total Score] prompt – when the note is saved, this is replaced by the total score from the monitoring. This can be used on its own simply to show the score in the note, or in conjunction with the IF function as mentioned above.
- The [Total Mapping] prompt – when the note is saved, this is replaced by the score mapping comment from the monitoring. This can be used on its own simply to show the score map in the note, or in conjunction with the IF function as mentioned above.
(3) – The light brown box in the bottom right of the note builder contains a breakdown of each section, question and element. These allow you to insert specific information from each section/question:
- Question Text – adds the question to the note.
- Response Mapping – adds the result of the score mapping to the note.
- Response Score – adds the total score to the note.
- Response Text – adds the chosen response to the question to the note.
- Section Text – adds the section heading to the note.
- [215-633QT S:1Q:1] = Question Text – Section 1 – Question 1
- [215-633RM S:1Q:1] = Response Mapping – Section 1 – Question 1
- [215-633RS S:1Q:1] = Response Score…
- [215-633RT S:1Q:1] = Response Text…
- [215-633ST S:1Q:1] = Section Text…
- [215-633QT S:1Q:1] – Is the sky blue? (Question Text)
- [215-633RT S:1Q:1] – Yes (Response Text)
- [215-633RM S:1Q:1] – Correct (Response Mapping)

21
After inserting an [IF] function, a new window will open where it can be configured.
1 – The IF is what the note checks – for example the Total Score, or Mapping.
2 – The drop down and other box is what the note compares the IF to. For example, IF Total Mapping Equals High Risk, then:
3 – the result of the IF function – what is shown if the requirements are met – for example, IF Total Mapping Equals High Risk, then XYZ is shown in the note.
There are 11 IF functions in total, each with their own use:
- < – IF smaller than …
- > – IF greater than …
- <= – IF smaller than or equal to …
- >= – IF greater than or equal to …
- Not Equal – IF does not match …
- Between – IF between a … and … (enter a number range)
- Starts With – IF begins with … (number or letter)
- Ends With – IF ends with … (number or letter)
- Contains – IF contains … (number, letter, word)
- Exists – IF … is found
- Doesn’t Exist – IF … doesn’t exist

Below is an example of a before and after of a note build and the output note. On the left and the prompts created in the builder and on the right is the data populated from the completed monitoring form.


22
The bottom of the creation form contains some final options regarding the creation of the output note:
– Display Note to Staff Member after Save? – when ticked, a preview if the note is shown after the monitoring is saved.
– Display Prompt before Saving? – when ticked, the staff member will be asked if they’re sure everything is correct.
– Allow Staff to Save Information as Draft? – when ticked, staff members can save their progress and resume the monitoring form at another time – this is useful for long forms which are completed over a wider time window.
– Allow Staff to Amend any Draft? – when ticked, any staff member can resume editing a form that they did not begin.
After completing the creation form, it is worth trying it out on CC Mobile to check that everything you have set up is as desired. You can then press Save in the bottom right corner to save the monitoring form. You will still be able to come back to edit the form until you activate it (see below). After activating a monitoring area, it cannot be edited, and is therefore worth getting right before doing so.